October 29, 2012

Methi Thepla

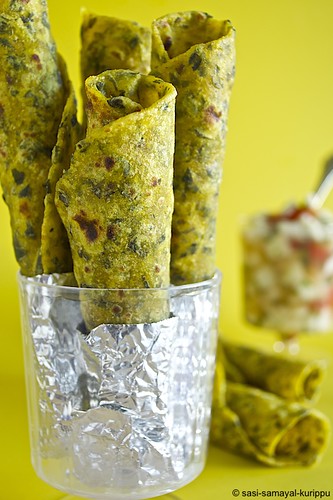
Last week at Indian stores, I just couldn't resist myself from buying a bunch of fresh, bright-green methi (fenugreek) leaves. Somehow, I feel that separating methi leaves from its stem is a cumbersome job. Other than that, methi leaves gives a wonderful aroma and unique taste to all the recipes in which it is added.


Basic Info
Complexity - Medium
Prep time - 30 mins - 1 hr
Cook time - 1 - 1.5 hrs
Serves - about 10 Theplas

Ingredients
Whole Wheat flour / Atta - 1.5 cups
Besan/Chickpea flour - 1/4 cup
Methi - 1 cup (chopped, fresh leaves)
Cumin seeds - 1 tsp
Turmeric powder - 1/2 tsp
Chilli powder - 1/2 tsp
Coriander powder - 1/2 tsp
Garam masala - 1/2 tsp (optional)
Salt - to taste
Yogurt - 3 tbsp
Oil - 2 tsp
Warm water - as required

_DSC0016

Method
Mix all of the dry ingredients together (along with methi leaves). Add yogurt and start kneading. Add water little by little as required and knead well until the dough comes together. Finally, add 2 tsp of oil and knead to make it a soft, smooth & firm dough. Cover and leave aside for 30 mins - 1 hr.

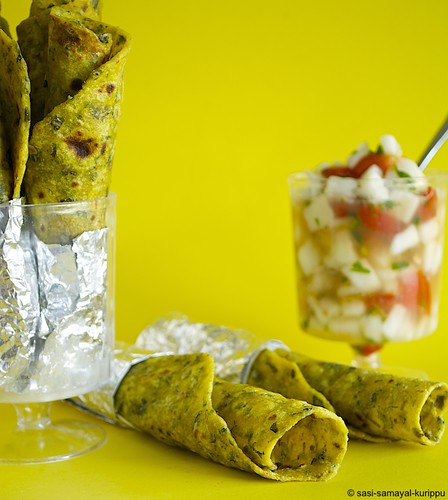
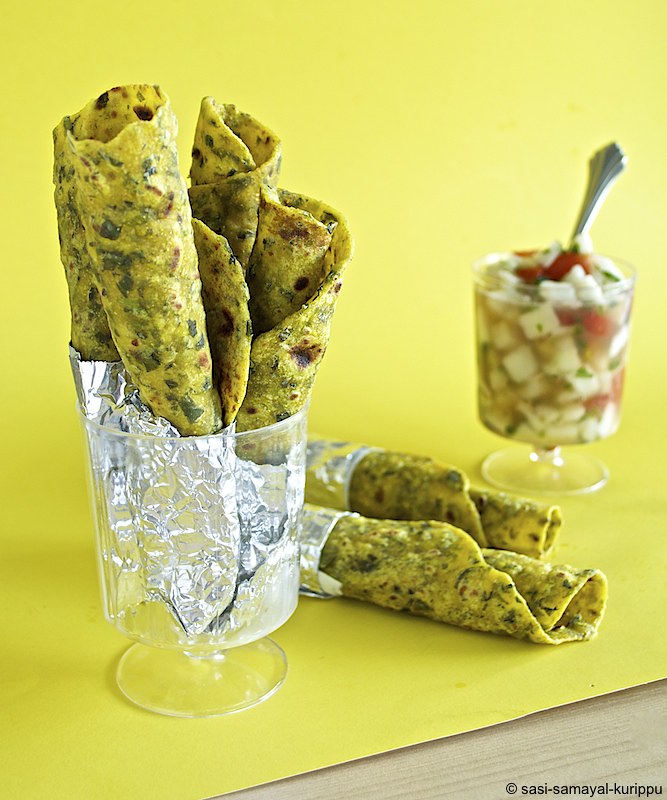
Divide the dough into 10 equal portions and roll them into balls. Dust the ball in whole wheat flour and roll it out into flat, thin and round shaped rotis. Repeat this for rest of the balls.

Heat a tawa/skillet on medium-high. When the pan is hot enough, carefully place the rolled-out roti into the pan and cook on both sides until brown spots appear. Smear little ghee/oil on both sides while cooking.


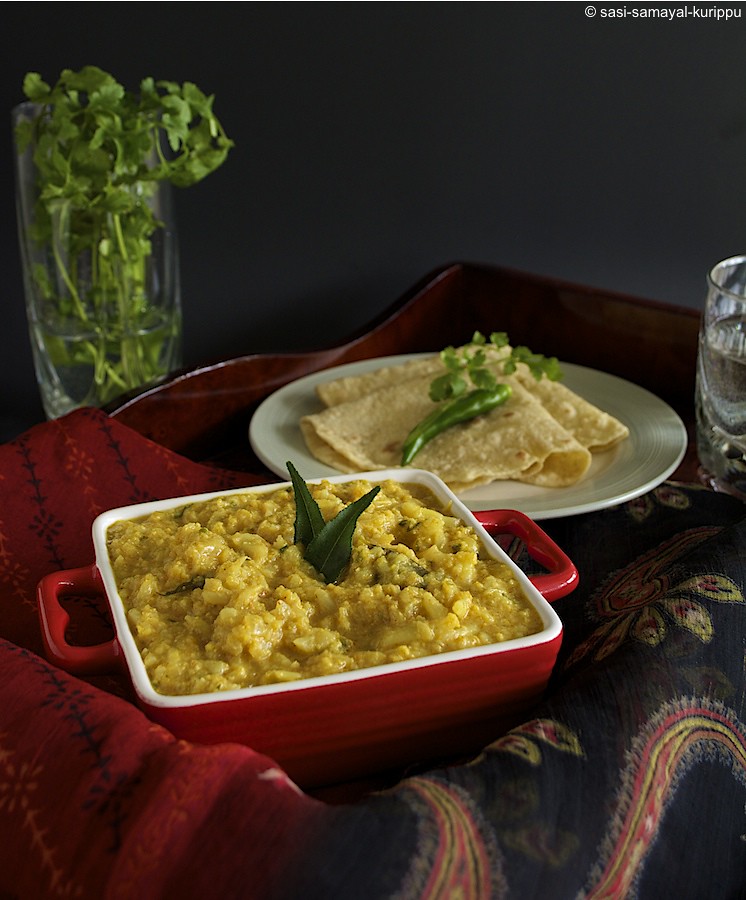
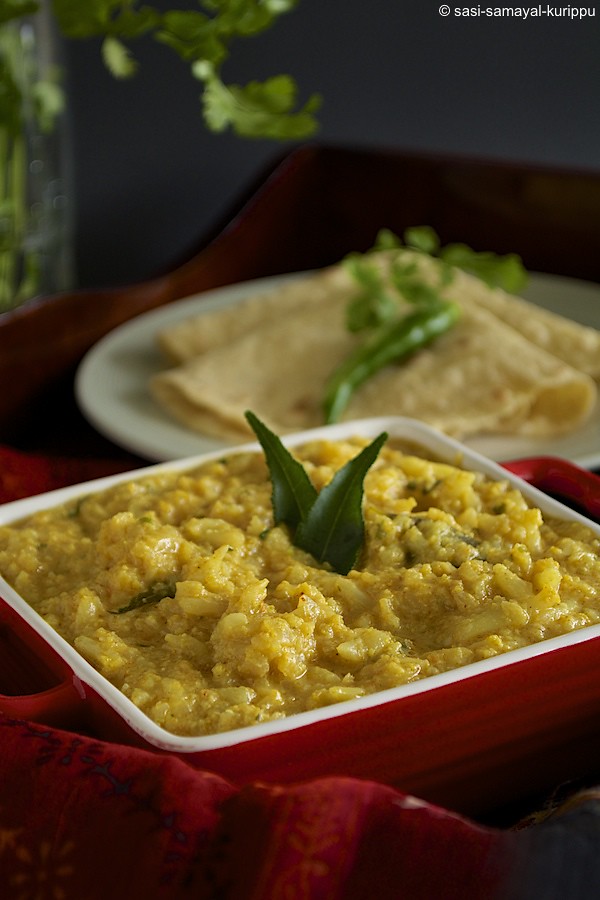
Remove from heat & store it in a closed container. Serve these healthy & tasty methi theplas with raitha / pickle.

Gongura pappu / Khatta Bhaji

Every place has a signature dish of their own. Chettinad kuzhi paniyaram, Mumbai Vada-pav, Kolkata Rosagulla, Perumal kovil Puliyodharai - to name a few, but the list goes on. One such quintessential dish from Andhra is Gongura pickle. These days, you get a lot of bottled gongura pickle in the market, but nothing can stand upto the authentic and original taste of home-made gongura pickle. 

Recently, we visited one of our friend's family from Andhra where I got to taste home-made gongura pickle. Gongura pickle with white rice and little ghee - incredible combo and unbelievable taste!! The tanginess from gongura leaves, spiciness from chillies, and the succulent flavor of garlic infused sesame oil is truly very appetizing. By the time we left, I was totally inspired to make some recipe with gongura leaves and that 's how ended up with this one here!

Gongura pappu is a dal stew made with sour greens and other spices. Hands down, gongura was the highlight of this dish. Gongura has a distinctive sour taste that tickles your taste buds, refreshes your palate and wakes up your senses that you crave more and more of the dish. Definitely one of the best ways to add some greens to your kid's diet - they will enjoy the zing that the sourness brings!


Basic Info
Complexity - Simple
Prep time - 10 mins
Cook time - 20 mins
Serves - 3 - 4

Ingredients
Toor dal - 1 cup
Water - 2 cups
Gongura leaves - 1 medium sized bunch
Ghee - 2 tbsp
Mustard seeds - 1/2 tsp
Split urad dal - 1/2 tsp
Red chillies - 3 nos (halved)
Green chilles - 3 nos (slit)
Hing - 1/4 tsp
Garlic cloves - 3 nos
Turmeric powder - 1/2 tsp
Red chilli powder - 1/2 tsp (or as preferred)
Curry leaves - 6-8 nos
Salt - to taste

Method
Separate gongura leaves from the stem; discard the stem. Wash gongura leaves in running tap water and pat them dry using a kitchen towel.

Pressure cook 1 cup of toor dal with 2 cups of water & turmeric powder for upto 4 whistles. Let it cool and after all the pressure is released, mash the dal with the back of a wooden spoon. Set aside.

Heat ghee in a pan, splutter mustard seeds. Add urad dal and fry until golden brown. Add green chillies, red chillies, curry leaves, hing, garlic and fry until garlic changes color and a nice aroma fills your kitchen.

Add gongura leaves and saute until the leaves changes its color and turns soft and mushy. Mash the leaves completely using the back of a spoon.

To this, add the mashed dal, required salt, red chilli powder, and 1 cup of water. Mix well and let it boil until the raw smell of the red chilli powder is gone. If you think the dal is too watery, heat until it reaches the desired consistency.

Remove from heat and serve it with rice/roti.


Notes
- You can also cook gongura leaves in pressure cooker for upto 2 whistles. Don' t try to cook dal & gongura leaves together, as the dal will not get cooked due to the tartness from gongura leaves.
- You can also add cumin seeds when tempering, I skipped it.
- If you like, you can also add chopped onions/tomatoes after tempering. Saute onion until translucent followed by tomatoes. Add gongura leaves only after the tomatoes are completely cooked.
- Replace ghee with oil for vegan option.

Linking this to "Lets Cook - Protein Rich Food" event hosted by Radhika of Tickling Palates.

October 25, 2012

Masala Corn

A simple, quick, spicy, flavorful recipe. Perfect for late afternoon cravings. Count this recipe in as an appetizer for your next party. This quick recipe needs no fancy ingredients but definitely is a fancy food and a crowd pleaser of all ages!


I used to love the masala corn that you get in those small stalls at Spencer's (Chennai, India). Masala corn is a simple snack bursting with lot of flavors.

That's my li'l one finishing up his non-spicy version of Masala Corn. Sorry about the shaken pic, though!
Basic Info
Complexity - Easy
Prep time - 10-15 mins
Cook time - 10-15 mins
Serves - 4

Ingredients
Corn on the cob - 4 nos (about 4 cups of corn)
Salt - to taste
Butter - 1-2 tbsp (More the butter better it tastes :))
Pepper (Freshly ground) - 2-3 tsp (or as required. I used white pepper powder for this recipe)
Lime juice - 2-3 tsp (or as required)
Chaat powder - 1-2 tsp (optional, I skipped this)
Cilantro - for garnish

Note
Adjust salt & pepper to your taste buds.

Method
Hold tight the corn horizontally on your cutting board. Run your knife firmly & carefully through the sides of the corncob and remove corn form the cob. Rotate the cob slightly and repeat with the next set of the kernel. Continue until the entire corn is done.

Steam the collected corn in a steamer until cooked.


To this, add rest of the ingredients and mix well, until butter is all melted & mixed evenly. Garnish with cilantro and serve in small cups.


Linking this to "Lets Cook - Protein Rich Food" event hosted by Radhika of Tickling Palates.

October 23, 2012

Mixed Vegetable Curry

They say, "The best way to someone 's heart is through their stomach". Couldn't agree more!


During the first few years of my career, I got an opportunity to travel to Tokyo and had to stay there for few months together! Just like a typical first timer, with butterflies in stomach, anxiously expecting the unexpected and set out!

What I love about these abroad trips is that I get an opportunity to be on my own, get to meet new people (have had lot of beautiful experiences along my way with Japanese - they are Godsend, so warm & kind!), explore new places (it was total fun roaming around those cleanest (EVER!) streets of Tokyo, malls, markets, electronic cities, 100 yen shops and what not!), learn new language (No kidding - I have actually cleared 2 levels of JLPT). On the flip side, I missed my family and most importantly food!

During one such occasion I got to be at one of my colleague's home for dinner. His wife had cooked us a scrumptious meal - chapathi, mixed vegetable curry, veg gravy, raitha, plain rice, and some pickle. Seriously, I don't have words to describe how good it tasted. That was heavenly for me PERIOD!!!!! 

During those days, I did not have much aspiration/time for cooking. Neither did I know the recipe nor did I bother to get the recipe from her for that curry. But, memory of eating hot rotis with such a filling & tasty veg curry will never fade!

This post is dedicated to that lovely couple - Mr & Mrs. Anu Jitesh. I fondly remember them whenever I make this curry.


Basic Info
Complexity - Easy
Prep time - 20 mins mins (If you use a chopper, you can save more time)
Cooking time - 30 mins
Serves - 3 - 4 people

Ingredients
Cauliflower - 1 (Medium sized, break it into small florets)
Potatoes - 2 no (Medium sized, peel the outer layer and chopped into smaller pieces)
Carrots - 2 no (Medium sized, chopped into smaller pieces)
Tomatoes - 2 no (Medium sized, chopped into smaller pieces)
Onion -1 no (Medium sized, chopped into smaller pieces)
Peas - 1/2 cup (I used frozen peas)
Green chillies - 2 nos (slit)
Cumin seeds - 1/2 tsp
Red chilli powder - 1 tsp
Coriander powder - 1 tsp (optional)
Tandoori masala - 1 tsp (optional, you can also use garam masala)
Cilantro - 1 tbsp (finely chopped)
Salt - to taste
Oil - 2-3 tbsp

Method
Heat oil in a big & deep pan. When the oil is hot, add cumin seeds and let them sizzle. Add onion, green chillies and give them a saute until onion turns translucent. Then, add tomatoes and saute them until soft. To this, add carrots, potatoes and saute them for about 3-4 mins until they are half-cooked. Then, add cauliflower florets, peas, salt, red chilli powder, tandoori masala and give them nice mix. Let the vegetables cook in medium flame until raw smell of masala powders are gone. Finally, garnish it with cilantro and remove from heat.


You can take a spoonful of this mixed veg curry on a roti, and carefully roll it out and pack it for picnic / lunch box.


This is a very simple yet packed-with-flavor vegetable curry that complements very well with chapathi/roti.


October 19, 2012

Mango rice

Have you heard of (or) eaten mango rice before? I wouldn't have if not for my neighbor who gave me a cup of mango rice for us to try. My daughter fell in love with it, instantly. To me, it tasted more like lemon rice except that the tanginess of lemon is substituted with raw mangoes - which means, sour & fresh raw mangoes would work really well for this recipe. This recipe is definitely a winner as VJ loved it, who by the way is not a big fan of variety rice.


This recipe works great for picnic/lunch box. Some chips/vathal on the side would make it an awesome combo.


Basic Info
Complexity - Simple
Prep time - 20 - 30 mins
Cooking time - 30 - 45 mins
Serves - 3-4 persons

Ingredients
Raw rice - 1 cup (cooked, I used sona masoori variety
Green Mango - 1.5 cups (Grated, I used about 1 medium sized mango)
Green Chillies - 4 nos (slit)
Cashews - 10 nos (broken)
Peanuts - 12-15 nos
Turmeric powder - 1/4 tsp
Mustard seeds - 1 tsp
Cumin seeds - 1/2 tsp
Red chillies - 2 nos
Channa dal - 1 tsp
Whole urad dal - 1 tsp
Grated coconut - 1/4 cup
Salt - to taste
Sesame Oil - 1-2 tsp
Ghee - 1 tsp
Curry leaves - 1 sprig

Method
Cook rice with 1.5 cups of water (1 : 1.5 proportion of rice and water) and a tsp of ghee for 1-2 whistles. Let it cool and gently fluff it up with a fork without breaking the rice.

Peel the outer layer of mango (I skipped this step as I was hurrying to finish my cooking). Use a shredder and grate it into bite size shreds.


Heat 1-2 tsp of sesame oil in a wide pan. When heated, splutter mustard seeds. Then, add cumin seeds, urad dal, channa dal, peanuts, cashews, red chillies, green chillies until lentils/cashews/peanuts are roasted. To this, add turmeric powder & salt and give it a toss. 


Finally, add shredded mango & grated coconut and mix them well. Saute it for about a min or so (Note: Mangoes need not be cooked, just a saute would be fine).


To this, add the cooked rice and mix gently. Serve raw mango rice with some vathal/chips on the side.


Note

  • You can also choose to cut mango into tiny pieces (or) grind it into a paste with coconut & green chillies, depending on how you like it. I haven't tried either of them but no complaints/regrets about shredded mango.
  • If you think that the mango is too sour, adjust the spice level (by adding green chillies) for the rice to taste better.
  • Instead of cashews/peanuts, you can also use cooked chickpeas (black/white).

Tandoori Paneer Tikka Pizza

I have a pizza lover at home - my daughter! Given a choice to eat outside, her first choice would be pizza - she simply loves pizza. However, she hates paneer. Few months ago, I made paneer pizza (regular pizza with paneer & other veggies and some masala sprinkled on top) thinking that my daughter wouldn't fuss about paneer since it is on a pizza. Obviously, I was wrong. She patiently took out each and every paneer from her pizza and made it a cheese pizza.

On the other hand, I love paneer and I am a big-time fan of desi pizza especially tandoori paneer pizza that we get here. So, this time I planned on making tandoori paneer tikka pizza (got this so-working recipe from a desi blog). The best thing about this pizza is that it is completely home-made - every single thing that I used in putting up this pizza - pizza base, pizza sauce, tandoori paneer & veggies, tandoori masala - is made from scratch.


Needless to say, pizza came out very good and we all loved it. The crust was super thin & not too crispy (just the way I like it!) with juicy & spicy paneer on top. This recipe is sure a keeper! Oh btw, did I tell you that my little one didn't care about the paneer slices in her pizza. Infact, she loved them!

Ingredients
All purpose flour - 2 cups
Rapid raise yeast - 1 tbsp + 1 tsp
Pepper powder (freshly ground) - 1/2 tsp
Garlic powder - 1.5 tsp
Warm milk - 1 cup
Oil - 1/8 cup
Salt - 1 tsp
Sugar - 1/2 tbsp

Sauce
Home-made chunky tomato pizza sauce - about 1/4 cup (for a large pizza)

Toppings
Tandoori paneer tikka - about 1-2 cups (for a large pizza)
Fresh mozzarella cheese (grated) - as required

Method
In a big bowl add all the dry ingredients (except milk) and mix well. Heat milk to approximately 110 degrees F (Milk cannot be neither too hot (or) cold. Only warm milk helps yeast to grow). Sprinkle milk over the dry ingredients little by little and knead till it forms a smooth dough. Brush with oil and cover the bowl with a seal-tight wrapper. Leave it in a warm place (I usually leave it in the oven with the oven light on) until it doubles in size (about 1 - 1.5 hrs). 

Take the dough out, punch it down to its original size and let it rise again. Repeat the same for about 2-3 times.

Preheat oven to 500 degrees F.

Roll out the dough on a lightly floured surface with a rolling pin (you can also use your hands to roll out the dough). Gently transfer this into a lightly floured pizza pan.

Brush little olive oil over the top of the dough. Spread required amount of home-made pizza sauce all over the pizza.


Now, arrange grilled paneer, bell pepper, onion, tomatoes on the pizza.


Sprinkle cheese generously and evenly on top of the veggies.


Bake for about 15-20 minutes (or) until the cheese is melted and gets a nice brown color.


Take it out of the oven, cut into slices and enjoy!


Linking this to "Let's Cook - Protein Rich Food" event hosted by Radhika of Tickling Palates.

October 15, 2012

Tandoori Paneer Tikka

Simply put, pieces (tikka) of paneer (& other vegetables) are marinated in yogurt & spices and grilled traditionally in a tandoor (clay oven that reaches over 800 degrees F). For our convenience, we can  also grill paneer & veggies over stovetop or in a conventional oven.

Though the ingredients seemed to be very simple & easily available in the pantry (except my home-made tandoori masala), the combination of flavor that it develops is amazing. Using hung-curd (curd that is hung overnight to remove excess water) gives a better coating of the marinade over paneer & veggies (I just used regular yogurt). Also remember, longer the marination better the flavor. 

Speciality of this recipe is that you can simply eat it as is (or) use them in other dishes that needs tandoori paneer & vegetables like Tandoori Paneer Pizza / Paneer Tikka masala.


Basic Info
Complexity - Medium
Prep time - 3 - 5 hrs (depending on how long you are planning to marinate)
Cooking time - 45 mins - 1 hr
Serves - about 3 cups of grilled paneer and vegetables

Ingredients
Paneer - 2 cups
Bell pepper - 1 no (Medium size)
Tomato - 1 no (Large size, de-seeded)
Onion - 1 no (small size)

For the marinade
Yogurt - 1/2 cup (well beaten)
Lemon juice - 2 tbsp
Ginger - 1 inch (grated)
Garlic - 2 pods (grated)
Tandoori masala - 2 tsp
Red chilli powder - 1.5 tsp
Garam masala - 1/4 tsp
Coriander powder - 1 tsp
Kasoori methi - 2 tsp (crushed)
Turmeric powder - 1/2 tsp
Salt - to taste

Method
Cut paneer into thin squares of 1 inch each. Cut onion, tomato & bell pepper into squares of about 1 inch.


Take a medium size bowl and mix all the ingredients given under "For the marinade".


To this, add paneer, bell pepper, tomato and onion. Use a spatula and gently mix the vegetables with the marinade so that each and every paneer/vegetable is evenly coated with it. Cover it and let it marinate for 1-4 hours in the refrigerator.


Soak bamboo skewers in cold water for 20-30 mins to avoid the bamboo sticks from burning. Thread paneer, bell pepper, tomato and onion in this pre-soaked bamboo skewers, repeating the sequence. 


Method 1 (stovetop): Now,  add 1-2 tsp of oil on a flat grill/pan and heat it on high. When the oil gets smoking hot, place the bamboo skewers on the pan and grill each side for about 3-5 mins until they get a nice char on all the sides. Keep rotating the sides until all the sides are evenly grilled.

Method 2 (conventional oven): Preheat oven to 375 degrees F. Place the bamboo skewers in a baking tray and brush them with some oil. Let it bake for about 20 mins. Keep rotating the bamboo skewers in between and bake until paneer turns golden brown. If you bake it for too long, paneer tends to get rubbery.


Take it off the flame and let them cool a bit. 


You can serve this as an evening snack with some lemon wedges as garnish.

Chunky pizza sauce

Why spend on jars & jars of pizza sauce when you can make your own fresh sauce bursting with lot of flavor, that too quickly & easily with very few basic pantry ingredients.

Home-made sauce definitely enhances the taste of pizza. Making pizza sauce not only gives you the pleasure and satisfaction of putting up an entirely home-made food, but you can also experiment with a lot of variations (by adding / reducing ingredients, try different herbs other than basil etc) and finalize on a recipe that will work for your entire family!

For a smoother texture, give it a pulse or two in a mixer until you get to the desired consistency. This works very well as pasta sauce too!


Basic Info
Complexity - Easy
Prep time - 15 mins
Cooking time - 30 mins
Serves - 1 cup of pizza sauce

Ingredients
Garlic - 2 cloves (minced)
Onion - 1/2 no (Small sized, chopped)
Green bell pepper - 2 tbsp (finely chopped)
Tomatoes - 6-8 nos (Medium sized, pureed/crushed)
Salt - per taste
Sugar - 1/2 tsp
Red pepper flakes - 1/2 tsp
Italian seasoning - 1 tsp
Basil leaves (fresh/dry) - 1 tsp
Olive oil - 1 tsp

Method
Heat a tsp of oil in a pan. To this, add red pepper flakes / chilli flakes and saute for a min or so. Next, add 2 cloves of minced garlic and saute for another minute. Now, add onion and green bell pepper and saute for about 2-3 mins. Then, add pureed/crushed tomatoes (alternatively, you can also use 10 oz can of crushed tomatoes), salt, italian seasoning, dry basil leaves (incase you are using fresh basil leaves, add it towards the end). Lower the heat and let it simmer and cook for 25-30 minutes.


October 13, 2012

Tandoori Masala

The secret for a perfect tandoori recipe is freshly ground spice mix bursting with lots of flavor & aroma. If you are planning on any tandoori recipes, make sure you make & use this masala for the marinade and you will surely notice a remarkable difference in flavor & freshness!

You can store this spice blend in a clean & dry air-tight container for upto a month or a little more. But remember, freshly ground home-made masala is always the BEST!


Ingredients
Coriander seeds - 2 tbsp
Cumin seeds - 4 tsp
Black peppercorns - 1 tsp
Garam masala powder - 1 tbsp
Red chilli powder - 2 tsp
Garlic powder - 1 tsp
Kasoori methi - 2 tbsp
Salt - 1 tsp

Method
In a heavy bottomed pan, dry roast coriander seeds, cumin seeds, black peppercorns until you get a nice aroma out of it. Let them cool completely and grind into fine powder.

To this, add rest of the powders and mix well. 


October 8, 2012

Cauliflower Kurma

This is the most famous "Saravana Bhavan" kurma that I was talking about in my Idiyappam post! This kurma goes very well with all south-Indian tiffin items like idiyappam, parotta, appam. Also makes a great side for rice/roti.


Basic Info
Complexity - Simple
Prep time - 20 mins
Cook time - 20 mins
Serves - 4

DSC_0221

Ingredients
Cauliflower - 1 Medium sized (cut into small florets)
Onion – 1 (Medium sized, chopped)
Tomato - 2 (Medium sized, chopped)
Green chillies - 1 (or) 2 (2 is on the spicier side, decide based on your spice tolerance level)
Cinnamon  - 1 inch
Clove - 3 nos
Cardamom - 1 pod
Ginger - 1 inch piece
Garlic - 4 pods
Turmeric powder - 1/2 tsp
Chilly powder - 1-2 tsp (2 tsp is on the spicier side, decide based on your spice tolerance level)
Coriander Powder - 1 tsp
Oil - 2 tbsp
Salt – as required
Chopped coriander leaves - 3 tbsp
Curry leaves - 1 sprig

To grind
Grated Coconut – 3 tsp
Cashews - 8 nos
Poppy seeds - 1 tsp
Roasted gram dhal - 1 tsp
Fennel seeds - 1 tsp

Method
Use a mixer and make a fine paste of ginger & garlic. Keep it aside.

In a pressure pan, heat 2 tbsp of oil. To this, add cloves, cardamom seeds and cinnamon and fry for couple of seconds. Then, add ginger-garlic paste, curry leaves, green chillies and onion. Saute well for about a minute or until onion turns translucent. Now, sauté tomatoes and cauliflower for few more minutes in medium flame.

After this, add turmeric powder, red chilli powder, coriander powder and mix evenly. Add about 1/2 cup of water & salt and pressure cook for 1 whistle. Let the cooker cool until its valve pressure is gone.

Meanwhile, grind all of the items under 'To Grind' into a fine paste and keep it ready.

Once all pressure from the cooker is released, add ground coconut-cashew paste and mix well. Let it get heated for few minutes. Finally, garnish with chopped coriander leaves.

DSC_0227

Idiyappam

Idiyappam and kurma brings back all good old memories of my college days. Can a food item really be nostalgic?!? Sure, why not ?!!!

I had "the" utmost fun during my college days, I should say - especially with my hostel roommates! Bunch of friends, crazy fun times, whole lot of nonsense talk, world of emotions, great experiences, sleepless nights, sad & lonely times, moments of togetherness, caring & sharing, good & bad times - my college days in an essence! My first time experience away from home in a metro-city with such wide & varied set of friends was truly amazing. Thanks to my dad who made it a point that I went through this incredible experience!

Hostel and horrible food goes hand in hand - without a doubt! So, we always look forward to each other's visitors. Guess why ?! - that is the only occasion when we can expect some good food! I had a roommate (from Gudiyattam) who actually got me introduced to "Idiyappam & Kurma" (from Hotel Saravana Bhavan). Her frequent visitors had never disappointed us in this matter! Just a plate of idiyappam (2 nos) with a small packet of kurma & 12 hungry souls (!!!!). I would have probably got a mouthful or two - but it was such a bliss that the taste still lingers fresh in my mind!

This is my humble attempt to re-live that experience with this home-made idiyappam & "Saravana Bhavan" style kurma. Try this for yourself to see what a hit it would be in your house too!


Ingredients
Idly rice - 3 cups
Salt - 1 tbsp
Coconut oil - 2-3 tbsp
Water - as required

Idly plates & Idly cooker
Sevai nazhi (with small holes)

Method
Soak idly rice in water for upto 5 hrs. Using grinder, grind soaked idly rice with required salt into a smooth batter.


Now, heat 2 tbsp of coconut oil in a pan. To this, pour the batter and keep stirring (to make sure that there are no lumps) until it thickens and you are able to make soft balls out of it.


Remember, the batter should neither be too thick nor watery. While the batter is warm, start to make idiyappam. Batter gets very tough to handle when cold!


Grease idli pans with little coconut oil. Using sevai nazhi, fill & press the mould with the batter and make idiyappam.


Quite frankly, it was very tough for me to press idiyappam and VJ helped me with it. Thanks to him!


Once you are done, arrange all the idli plates into idli cooker and steam idiyappam for about 5 -10 mins.


Use a spoon and carefully remove steamed idiyappam from the idli plates. Idiyappam is now ready to be served.